If you want to enroll a large number of devices in an enterprise scenario, you can use a device enrollment manager (DEM) account in Microsoft Intune. The DEM is a special account in Microsoft Intune that allows you to enroll up to 1,000 devices. (Standard users can manage and enroll up to 15 devices.) For security reasons, the DEM user should not also be an Intune administrator. Each enrolled device requires a single Intune license. By default, no device enrollment account user is present in Microsoft Intune.
Typically, these DEM accounts might be IT personnel. To configure enrollment managers, from the Microsoft Intune admin center, select the Device enrollment node and use the following procedure:
- From the Enroll devices page in Intune, click Device enrollment managers.
- Click Add, and then enter the email address of the enrollment managers you want to specify and click Add.
The complete list of Device enrollment managers is displayed, as shown in Figure 3-9.
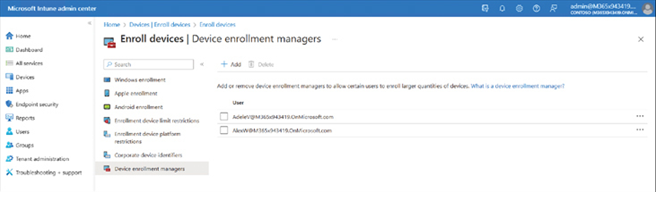
FIGURE 3-9 Defining Device Enrollment Managers
Need More Review? Enroll Devices using Device Enrollment Manager
For more information on the DEM in Microsoft Intune—together with example scenarios and limitations of devices that are enrolled with a DEM account—visit https://learn.microsoft.com/mem/intune/enrollment/device-enrollment-manager-enroll.
Another possible solution to bulk enrolment is to create and distribute a provisioning package. You use the Windows Configuration Designer, part of the Windows Assessment and Deployment Kit (Windows ADK). You can download Windows ADK from Microsoft and install it on a workstation in IT.
Note Windows ADK Download
Ensure that you download the appropriate version of the Windows ADK for your version of Windows—specifically, the version installed on your management workstation.
Use the following procedure to create a provisioning package for enrollment:
- Open Windows Configuration Designer, and on the home page, select the Provision desktop devices tile.
- In the New Project wizard, on the Enter project details page, enter a Name, and, optionally, a Description.
- Click Finish. A new tab in Windows Configuration Designer opens.
- On the new tab, enter the required information on the Set up device and Set up network pages.
- Then, on the Account management page, in the Manage organization/school accounts section, select Enroll in Azure AD.
- Select Get Bulk Token. You are prompted to sign in to Microsoft 365. Enter a device enrollment manager’s credentials.
- On the Account management page displayed in Figure 3-10, click Next.
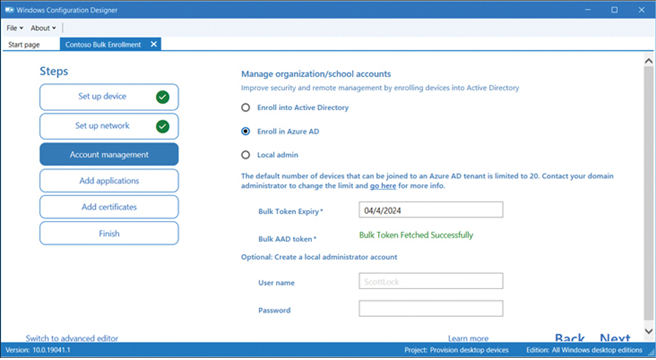
FIGURE 3-10 Performing bulk enrollment
- Configure any desired settings on the Add applications and Add certificates pages, and then on the Finish page, select Create.
You can now distribute and install the provisioning package. You must distribute the .PPKG and .CAT files, which are stored where your package was created.